

Setting Up Forge UI for FLUX Models
To run FLUX models without VAE and Clip in Forge UI, extract the Forge UI files from the downloaded zip and proceed to the extracted folder. Run “update.bat” to install necessary components, then run “run.bat” to launch Forge UI in your browser.
Selecting FLUX UI
Choose FLUX UI from the “UI” dropdown and select the FLUX checkpoint model from available models. Configure diffusion settings according to FLUX model requirements.
Adjusting GPU VRAM Levels
Adjust GPU VRAM levels for peak performance. For common GPUs with 8 GB VRAM, this may involve setting it slightly lower than the card’s VRAM. Monitor GPU usage to adjust accordingly to your system.
Refining Settings
Further refinement of settings can enhance your experience with FLUX models in Forge UI. Ensure you have the latest version of Forge UI and follow the guidelines for specific model configurations.
Required Models and Files
If running FLUX models requires additional files like VAE and text encoders, place them in the appropriate folders, such as ‘*your forge installation folder*\webui\models\VAE’. Download necessary models like clip L and clip T5xxl and place them in the correct folders as needed.
Table of Contents Toggle
- Key Takeaways
- Forge UI Installation Guide
- Downloading FLUX Models
- Organizing FLUX Components
- Loading FLUX in Forge UI
- Configuring FLUX Settings
- Managing VRAM for FLUX
- Prompting for FLUX Models
- Troubleshooting FLUX Issues
Key Takeaways
Step-by-Step Guide to Running Flux in Forge UI
Key Takeaways:
Update Forge UI for latest features and compatibility.
Configure FLUX Settings for optimal performance.
Manage GPU VRAM to prevent out-of-memory errors.
Detailed Steps:
Update Forge UI: Ensure you have the latest version of Forge UI to support FLUX models and avoid compatibility issues.
Download FLUX Checkpoint: Download the FLUX model checkpoint suitable for Forge UI from the Hugging Face repository.
Configure FLUX Settings: Set the diffusion settings according to FLUX model requirements, including low bits (e.g., FP8 or NF4) in Forge UI.
Manage GPU VRAM: Adjust GPU VRAM levels slightly lower than the card’s total VRAM to optimize performance and prevent out-of-memory errors.
Run FLUX in Forge UI: Open Forge UI by running ‘run.bat’, select FLUX UI, and choose the FLUX checkpoint model from the list of available models.
Note: For more detailed instructions, refer to specific resources like the Forge UI GitHub pageand relevant user guides.
Forge UI Installation Guide
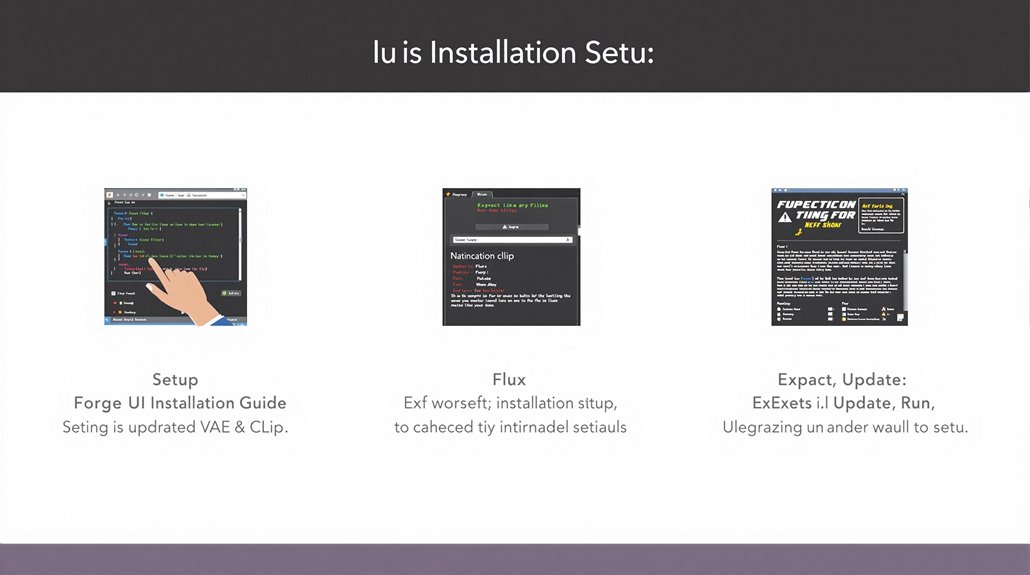
Forge UI Installation Guide
For Forge UI Installation, follow these steps:
Move to the extracted folder containing Forge UI files.
Configure “webui-user.bat” with the “Automatic1111” directory path and add “–theme dark” for dark mode.
Verify Dependencies:
Ensure all necessary dependencies like Python, Git, CUDA 12.1, and Pytorch 2.3.1 are included. The installation includes everything needed and does not interfere with other installations of stable diffusion.
If issues arise, consult Forge UI troubleshooting:
Check extraction and dependencies.
Run “update.bat” again.
Refer to the official GitHub repository documentation for additional guidance.
Setting Up the Environment:
Extract the Forge UI files from the downloaded zip.
Navigate to the extracted folder and click on “update.bat” to install necessary components.
Wait for the installation to complete, then run “run.bat” to launch Forge UI in your browser.
By following these steps, you can successfully set up the Forge UI environment.
Troubleshooting:
Verify the correct directory path is used in “webui-user.bat.”
Ensure all dependencies are correctly installed.
Consult the GitHub repository documentation for detailed troubleshooting steps.
Configuring WebUI:
Right-click “webui-user.bat” and edit it with the “Automatic1111” directory path.
Add “–theme dark” to enable dark mode.
Save the changes and run “run.bat” to access Forge UI in your browser.
Remember to always use the correct backslashes () and forward slashes (/) when copying directory paths.
For optimized performance, consider using NVIDIA GPUs for better compatibility with Forge UI.
The Flux model integration process requires selecting the appropriate Checkpoint Model, such as Flux 1 NF4, within the Forge UI interface for effective AI image generation.
Downloading FLUX Models
Integrating FLUX Models
To integrate FLUX models into your environment, access the Hugging Face repository and select the model size that suits your storage needs. For instance, the FLUX Dev Model is available in different sizes, including 8GB.
Users should consider model compatibility and storage optimization to ensure smooth performance. Larger models provide more detailed images but require more storage and computational resources.
Balancing image quality with computational resource demands is crucial, and model size should be smaller than GPU VRAM for optimal performance.
Download and Installation Steps
Access the Hugging Face Repository: Visit the Hugging Face repository to select and download FLUX models.
Choose Model Size: Select the appropriate model size based on your storage needs, such as the 8GB version of the FLUX Dev Model.
Upload to U-net Folder: Upload the downloaded model to the U-net folder.
Install GGUF Node Package: Install the GGUF Node Package via the GitHub link into custom-nodes folders.
Place Essential Files Correctly: Ensure proper placement of essential files, such as VAE, CLIP text encoder, and T5 text encoder, in designated folders for successful model operation.
The GGUF Model requires specific installation steps, including placing the GGUF file in the U-net folder and ensuring that the ComfyUI setup is compatible with GGUF model formats.
Model Variants
FLUX Dev Model: Includes FP8 and FP16 clips and is suitable for high-quality image generation.
Schnell Model: A distilled version optimized for efficiency.
Next-Gen Flux Model: Offers advanced features and capabilities.
GGUF Model: Available in different sizes, such as 8GB, and can be used for various image generation tasks.
Considerations
When selecting a model, it’s essential to balance image** quality** with computational resource demands. Larger models may produce more detailed images but require more storage and computational power.
Proper installation and placement of model files are critical for successful image generation.
Organizing FLUX Components
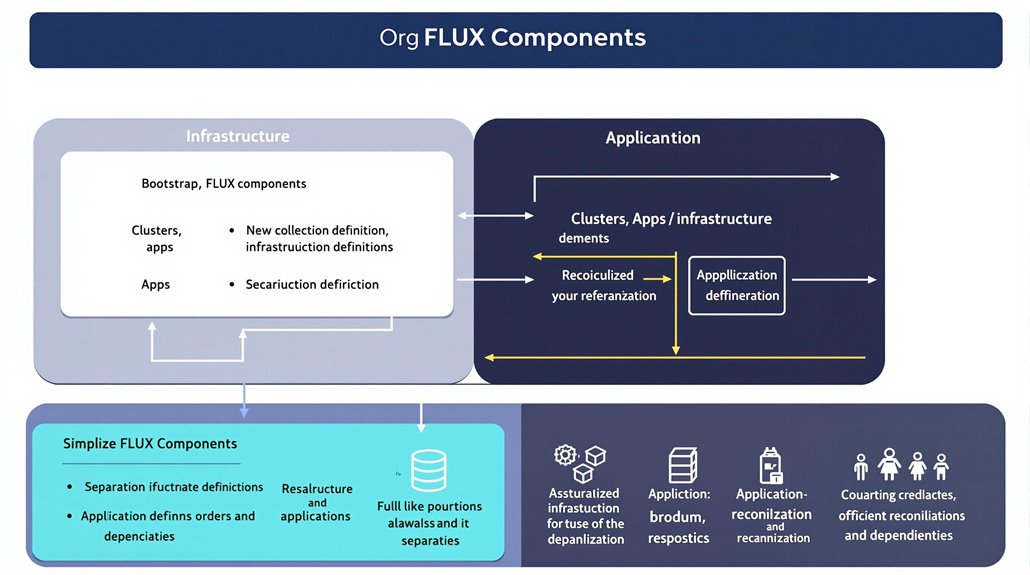
Organizing FLUX Components Effectively
To manage multiple clusters and tenants efficiently, organizing FLUX components into a logical structure is crucial. This involves creating bootstrap repositories to house infrastructure and application definitions, thus ensuring clear reconciliation orders and dependencies.
Reconciliation and Dependency Management
A well-structured repository helps minimize operational overhead. For instance, separating applications and infrastructure allows for controlled reconciliation, ensuring that cluster addons and Kubernetes controllers are updated before applications.
A well-structured repository helps in managing the complexity of updates. By separating the definitions of applications and infrastructure, you can ensure that critical components are updated in the correct order. The unidirectional data flow in FLUX ensures that data updates in stores flow singularly through the dispatcher.
Flux Instance Independence
By understanding the Flux architecture and component interactions, users can achieve robust continuous delivery workflows. Each Flux instance operates independently yet cohesively within the larger infrastructure. The Flux Terraform Provider Terraform Integration enhances this independence by allowing for seamless integration with Terraform capabilities.
This independence guarantees seamless reconciliation across different environments. Understanding how each Flux instance interacts with other components is key to maintaining a smooth operational flow.
Repository Structure Examples
Consider structuring repositories with dedicated directories for clusters, apps, and infrastructure. For example:
Clusters: Production and staging directories define specific cluster states.
Apps: Base, production, and staging directories manage application overlays and deployments.
Infrastructure: Base, production, and staging directories configure underlying infrastructure resources.
This structure facilitates automated image updates and controlled promotions between environments. It leverages Flux’s automated image updates to maintain desired states across all environments.
Loading FLUX in Forge UI
Download the latest version of Forge UI from the official GitHub repository and unzip it to a directory on your computer.
Download the FLUX model checkpoints suitable for Forge UI, such as ‘flux1-dev.safetensors’ from huggingface.co, and place them in the ‘models’ directory within the Forge UI folder.
Configuring FLUX
Open Forge UI by running the ‘run.bat’ file and select the FLUX UI from the “UI” dropdown.
Choose the FLUX checkpoint model from the list of available models. Ensure that the VAE and text encoder files are correctly placed in their respective folders if your FLUX model requires them.
Set the diffusion settings according to the FLUX model requirements. The update.bat file must be run before starting Forge UI to ensure compatibility with the latest software updates Running Update.
Verifying Model Placement
Navigate to the ‘models’ folder to verify that the FLUX checkpoint models are correctly placed and named.
Proceed to enter the prompt for generating images with the FLUX model.
Using FLUX Models
FLUX Models come in different formats: some are all-in-one model files, while others are model-only files that require separate VAE and text encoders.
Select the appropriate FLUX model and ensure any additional files are correctly loaded in Forge UI.
Important Note: Forge UI offers a more streamlined and user-friendly experience compared to ComfyUI, especially for those looking for a simplified interface without the complexity of node-based workflows Streamlined Interface.
Configuring FLUX Settings
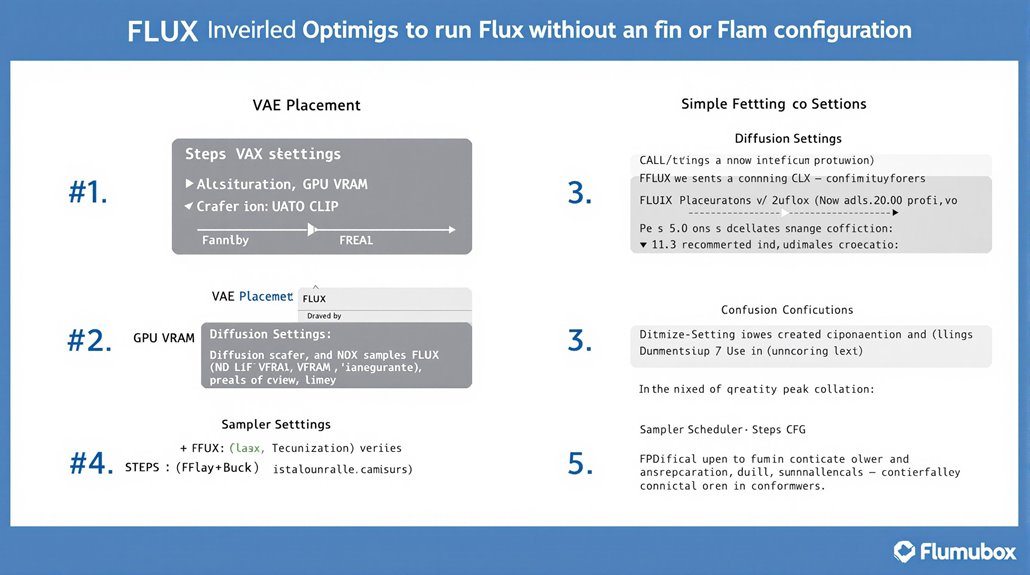
Optimizing FLUX Settings for Peak Performance
Place the VAE and encoders in designated folders: ‘\stable-diffusion-webui-forge\models\VAE’ and ‘\stable-diffusion-webui-forge\modelsext_encoder’, respectively.
VAE Placement: Ensure VAE is in ‘\stable-diffusion-webui-forge\models\VAE’ to avoid errors.
Adjust GPU VRAM levels slightly lower than the card’s VRAM and monitor usage to optimize performance.
Diffusion Settings: Use settings such as ‘fp16 LoRA’ for diffusion in low bits. Consider ‘float8-e4m3fn’ or ‘bnb-fp4’ for better efficiency. The FLUX models come in three versions, including Schnell, which is designed for rapid deployment and ease of use.
Sampler and Scheduler: Set the correct Sampler and Scheduler, such as Oiler sampler and Simple scheduler for both Schnell and Dev models.
Steps and CFG: Adjust the steps (e.g., 4 steps for Schnell, 20-30 steps for Dev) and CFG settings (e.g., setting CFG to 1 to ignore negative prompts) to fine-tune FLUX workflows.
VAE and Encoder Configuration: Proper placement of VAE and encoders in designated folders is crucial for optimal FLUX performance.
GPU VRAM Adjustment: Lowering GPU VRAM levels slightly helps prevent memory errors and improves overall efficiency.
Sampler Configuration: Choosing the right sampler ensures smooth, error-free image generation.
CFG and Step Settings: Adjusting CFG and Step Settings allows for precise control over FLUX workflows.
It is essential to verify that the latest version of Forge UI is installed to ensure compatibility with the latest FLUX models.
Managing VRAM for FLUX
Managing VRAM for FLUX is crucial to prevent performance issues. Tools like ‘nvidia-smi’ help track VRAM usage and identify potential out-of-memory errors.
To find the perfect balance for your specific workload, incrementally adjust the ‘vram’ setting and disable unnecessary features like the NSFW checker.
Using xformers or torch-sdp on CUDA-enabled GPUs can also reduce VRAM requirements, improving overall performance in image generation tasks.
VRAM Optimization is key to maximizing GPU utilization. By tracking and managing VRAM usage, you can avoid performance drops and ensure efficient resource allocation.
Tools for Monitoring GPU usage, such as ‘nvidia-smi’ and ‘nvtop’, provide detailed insights into VRAM usage and GPU utilization.
These tools help identify potential bottlenecks and optimize system configuration for better performance.
Effective VRAM Management involves understanding the specific VRAM requirements of your applications and adjusting settings accordingly.
This approach ensures smoother performance and reduces the risk of out-of-memory errors.
For GPUs with 16GB VRAM, configuring the ‘vram’ setting to 0.25 in ‘invokeai.yaml’ is generally recommended optimal VRAM configuration.
The FLUX.1-schnell model typically requires high VRAM at least 24GB, emphasizing the importance of proper VRAM management for optimal performance.
Prompting for FLUX Models
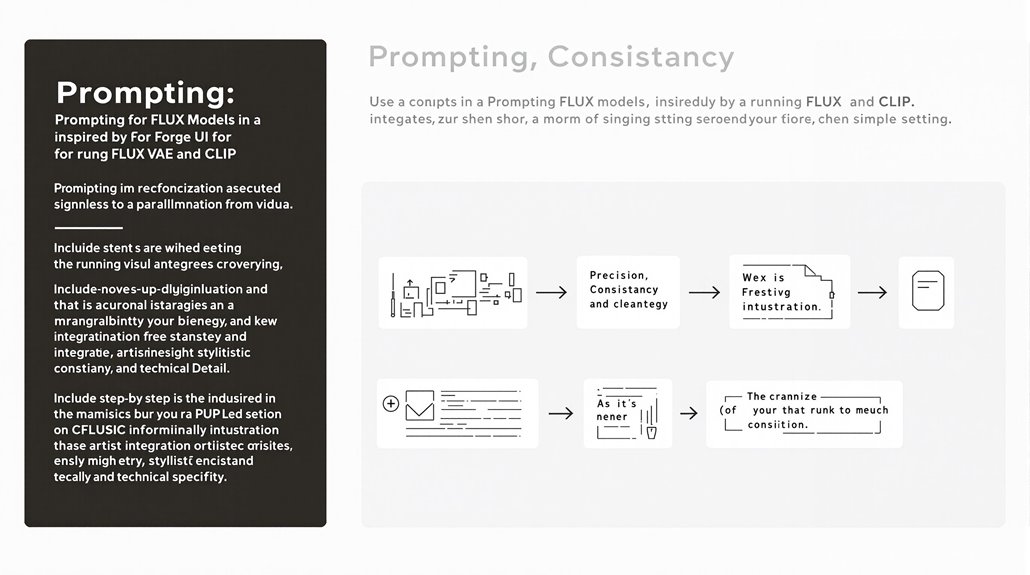
Artistic Integration and Stylistic Consistency are crucial when writing prompts for FLUX models. To achieve this, use natural language and be precise and detailed in your prompts.
Include technical specifications if necessary, and guide the AI with phrases like “emphasize” or “focus on.”
Organizing ideas logically prevents chaotic prompting and ensures high-quality outputs. For example, specifying “painterly style” or “technique-inspired” can help the AI generate more accurate results.
Precision is key when combining styles or requesting specific artistic techniques. Use detailed descriptions and examples to achieve the desired output.
This approach helps the AI model understand and replicate complex styles effectively.
Consistency is maintained by using consistent language and style references in your prompts. This ensures that the AI generates outputs that align with the desired artistic vision.
Guiding the AI with clear and concise language is essential. Avoid ambiguity and use specific examples to illustrate the desired style or technique.
This approach helps the AI produce results that meet your expectations.
Style References can be included in prompts to maintain consistency and achieve specific artistic effects. Use detailed descriptions of techniques and styles to guide the AI and ensure high-quality outputs.
Furthermore, incorporating Chain-of-Thought Prompting can enhance the AI’s problem-solving capabilities by breaking down complex tasks into manageable steps.
Balancing detail and freedom is critical for effective FLUX.1 prompts, as too many details can confuse the AI, making it essential to leave some aspects open to interpretation for creative and accurate results.
Troubleshooting FLUX Issues
Troubleshooting FLUX Issues
Understanding Log Locations
Engine logs are found in the logs folder of the Flux installation directory, named ‘flux–dd-MMM-yyyy.log’, while operations console logs are named ‘opsconsole-dd-MMM-yyyy.log’.
Identifying Unresponsive Engines or Workflows
For unresponsive engines or workflows, gather log files at the FINEST level and obtain thread dumps from the JVM taken at least 5 minutes after the engine becomes unresponsive.
Connection Issues
Verify that the MAX_CONNECTIONS parameter is large enough to accommodate all client connections and background tasks.
Regularly occurring deadlocks may indicate an underlying issue, and database transactions should use XA resources or XA database connections to facilitate rollbacks if necessary.
Debugging Memory Issues
Enabling heap dump on out-of-memory errors using ‘-XX:+HeapDumpOnOutOfMemoryError’ can help debug memory issues.
Using Flux CLI for Troubleshooting
Tools like ‘flux get all -A –status-selector ready=false’ and ‘kubectl get events -n flux-system –field-selector type=Warning’ can assist in identifying and resolving issues.
Troubleshooting Methodology
Identify the Problem: Recognize the symptoms and gather initial information.
Analyze Logs and Performance: Use commands like ‘flux logs –all-namespaces –level=error’ to find controller errors and assess system readiness.
Implement Solutions: Based on the identified problem and analysis, apply necessary fixes.
Verify System Functionality: Test the system to ensure the issue is resolved.
Additional Troubleshooting Tips
Flux CLI: Use ‘flux get source all -A’ to check for Ready=True and Suspend=False.
Event Spam: Edit YAML manifests to remove empty fields that cause drift events.
Install Retries Exhausted: Use ‘flux get helmreleases –all-namespaces’ to identify failed installations and ‘kubectl describe deployment’ to inspect deployments.
Common Issues
Helm Charts and HelmReleases CRDs Conflict: Use fully qualified kubectl commands or flux CLI to avoid conflicts.
Raspberry Pi Issues: Update the swap file to at least 1GB to prevent out-of-memory conditions.
To diagnose engine or JVM crashes, our first step should be to check for known bugs in the JVM version used, which can be found in Sun’s bug database by searching for JVM Known Issues.
For advanced troubleshooting, inspecting the HelmRelease events with ‘kubectl describe helmrelease -n ‘ can provide detailed information about installation and upgrade failures.
By following these steps and using the mentioned tools, troubleshooting FLUX issues can be more efficient and effective.